
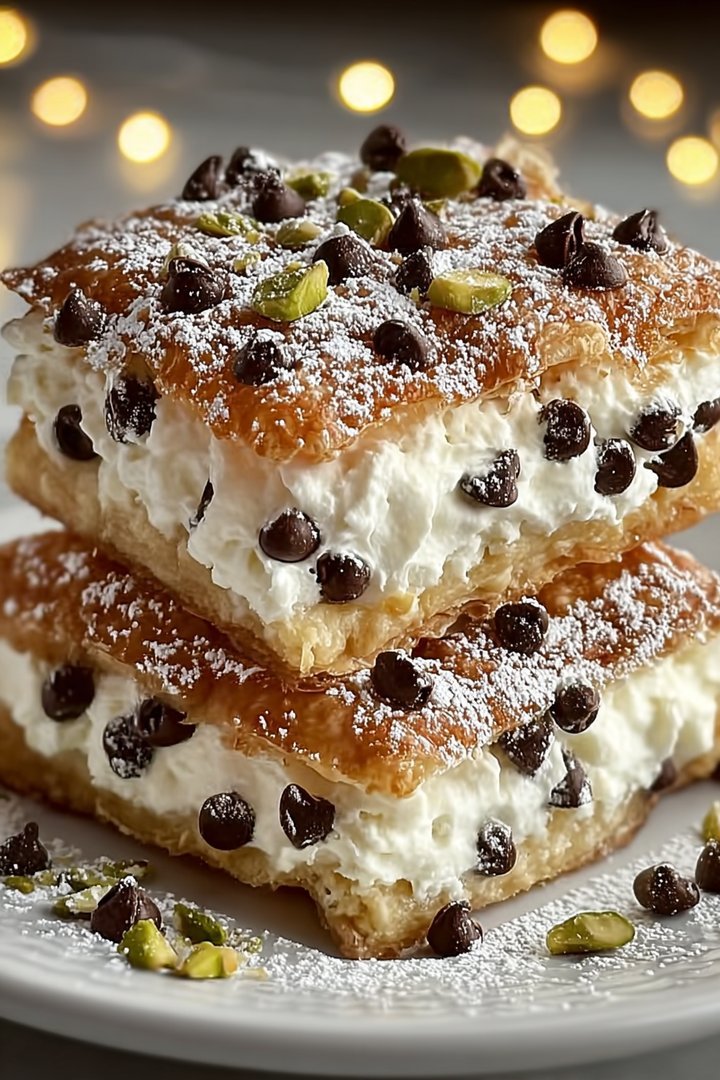
Picture this: a symphony of creamy ricotta, a delicate dance of sweetness, and a satisfying crunch, all harmonizing in a single bite. We’re talking about **classic cannoli squares that will wow your taste buds**, a dessert experience so delightful it’ll have you questioning everything you thought you knew about happiness.
These aren’t your run-of-the-mill, boring desserts; they’re a flavor adventure that’s both sophisticated and playful, perfect for impressing guests or simply treating yourself after a long day. Get ready to create a little magic in your kitchen!
Here’s why you’ll absolutely adore these squares:
- Effortless elegance meets simplicity with a recipe that’s surprisingly easy to execute, even for baking novices.
- The creamy ricotta filling perfectly complements the crispy shell, creating a textural contrast that is a delight.
- These squares are visually stunning, making them the perfect centerpiece for any dessert table or special occasion.
- You can effortlessly customize the toppings and flavors to suit your personal preferences, making them unique.
Ingredients for Classic Cannoli Squares That Will Wow Your Taste Buds
Here’s what you’ll need to make this delicious dish:
The full ingredients list, including measurements, is provided in the recipe card directly below.
How to Make Classic Cannoli Squares That Will Wow Your Taste Buds
Follow these simple steps to prepare this delicious dish:
Step 1: Make the Crust
In a large bowl, whisk together flour and sugar. Cut in cold butter using a pastry blender or your fingers until the mixture resembles coarse crumbs. Whisk in the egg yolk, add ice water, one tablespoon at a time, until the dough comes together.
Step 2: Chill the Dough
Form the dough into a disc, wrap it in plastic wrap, and chill in the refrigerator for at least 30 minutes. This allows the gluten to relax, making the dough easier to roll out.
Step 3: Prepare the Ricotta Filling
While the dough is chilling, prepare the filling. In a medium bowl, combine ricotta cheese, powdered sugar, Alcohol-free vanilla extract, and orange zest. Mix well until smooth and creamy. Gently fold in the mini chocolate chips.
Step 4: Assemble and Bake
Preheat your oven to 375°F (190°C). Roll out the chilled dough on a lightly floured surface to about 1/8-inch thickness. Cut into squares and arrange them on a baking sheet lined with parchment paper. Bake for 12-15 minutes, or until golden brown.
Step 5: Fill and Decorate
Let the baked squares cool completely on a wire rack. Once cooled, spoon or pipe the ricotta filling onto each square. Garnish with chopped pistachios and candied orange peel.
Step 6: Serve and Enjoy
Arrange the **classic cannoli squares that will wow your taste buds** on a platter and serve immediately, or chill for later. They are best enjoyed fresh.
Perfecting the Cooking Process
To achieve cannoli square perfection, start by preparing the creamy filling. While the filling chills, bake the square shells. Once the shells cool, gently fill them, ensuring even distribution of the creamy goodness. This sequence ensures a smooth, delightful assembly.
Add Your Touch
Unleash your inner artist with these Classic Cannoli Squares That Will Wow Your Taste Buds! Experiment with different extracts like almond or pistachio for a unique twist. Consider adding mini chocolate chips or chopped nuts to the filling for extra texture and flavor. A dusting of powdered sugar is always a nice touch.
Storing & Reheating
Store assembled cannoli squares in an airtight container in the refrigerator for up to 2 days. For optimal texture, it’s best to enjoy them fresh. If the shells soften, a brief stint in a low-temperature oven can help crisp them up slightly, but honestly, they are best enjoyed cold.
Here are a few tips to elevate your cannoli square game:
- For the crispiest shells, ensure they are completely cooled before adding the filling. Warm shells will soften.
- Use a piping bag to fill the squares evenly and neatly, avoiding any messy spills and ensuring a perfect presentation.
- Chilling the filling thoroughly is crucial for achieving the perfect texture. Don’t rush this step for the best results.
(Personal anecdote formated as paragraph subheading)
I remember the first time I made these Classic Cannoli Squares That Will Wow Your Taste Buds for a family gathering. My aunt declared them “better than any bakery,” which, of course, made me blush like a kid!
Conclusion for Classic Cannoli Squares That Will Wow Your Taste Buds :
These **Classic Cannoli Squares That Will Wow Your Taste Buds** are a guaranteed crowd-pleaser. With their creamy filling and flaky crust, they’re a delightful twist on the traditional cannoli. The ease of assembly makes them perfect for any occasion, from casual gatherings to elegant parties. Remember, you can prepare them ahead of time, but don’t freeze them. So go ahead, whip up a batch of these delicious squares and prepare to be amazed by the rave reviews. You’ll be the dessert hero everyone’s talking about!
Print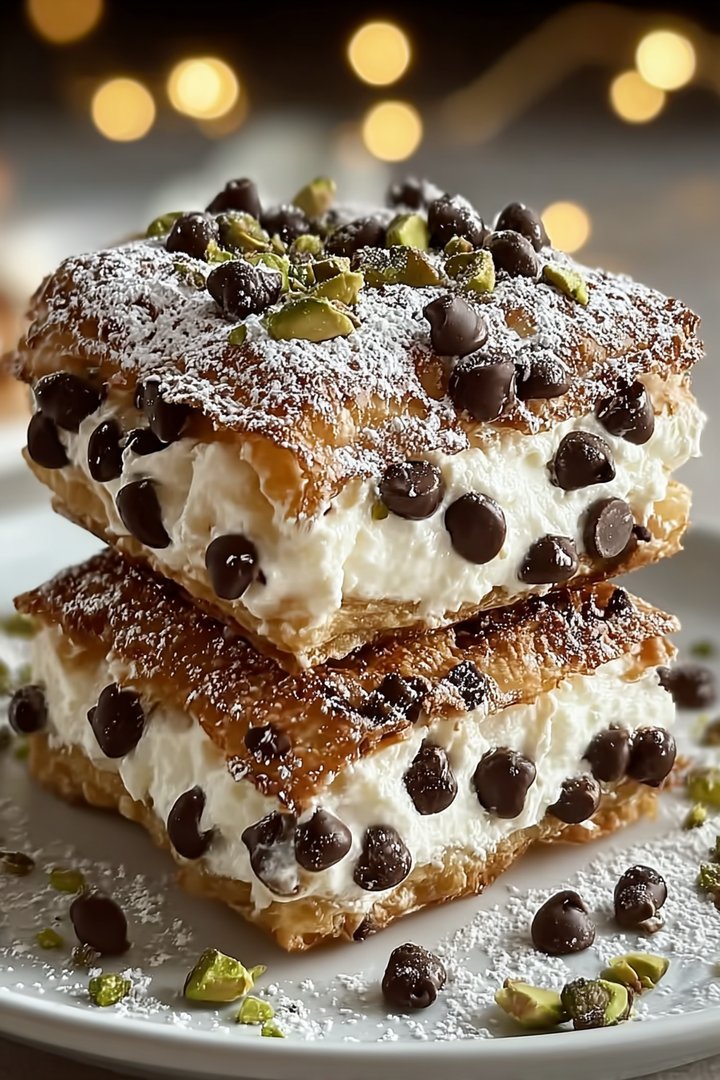
Classic Cannoli Squares That Will Wow Your Taste Buds
Delicious classic cannoli squares that will wow your taste buds recipe with detailed instructions and nutritional information.
- Total Time: 35 minutes
- Yield: 4 servings
Ingredients
- All-purpose flour: 2 1/2 cups
- Unsalted butter, cold and cubed: 1 cup (2 sticks)
- Granulated sugar: 1/2 cup
- Large eggs: 2
- Ricotta cheese, whole milk: 32 oz
- Powdered sugar: 1 cup
- Mini chocolate chips: 1/2 cup
- Orange zest: 1 teaspoon
Instructions
- Step 1: Preheat oven to 350°F (175°C). In a large bowl, combine the flour, butter, and sugar. Use a pastry blender or your fingers to cut the butter into the flour until the mixture resembles coarse crumbs.
- Step 2: Beat in the eggs until just combined. Do not overmix. Press the dough into the bottom of a 9×13 inch baking pan. Bake for 20-25 minutes, or until lightly golden brown. Let cool completely.
- Step 3: While the crust is cooling, prepare the filling. In a large bowl, beat the ricotta cheese and powdered sugar until smooth and creamy.
- Step 4: Gently fold in the mini chocolate chips and orange zest.
- Step 5: Once the crust is completely cool, spread the ricotta filling evenly over the top.
- Step 6: Refrigerate for at least 2 hours before cutting into squares and serving.
Notes
- For best results, keep assembled cannoli squares refrigerated in an airtight container to prevent the crust from getting soggy.
- If you want a slightly softer crust, let the squares sit at room temperature for about 15 minutes before serving.
- Garnish each square with an extra sprinkle of mini chocolate chips or a dusting of powdered sugar for a beautiful presentation.
- Don't overmix the crust dough – a gentle hand ensures a tender, flaky base for your creamy cannoli filling.
- Prep Time: 15 minutes
- Cook Time: 20 minutes
- Method: Stovetop
- Cuisine: American
FAQs :
Can I make these Classic Cannoli Squares ahead of time?
Absolutely! In fact, I encourage it. These cannoli squares are fantastic when the flavors have had a chance to meld together. You can prepare them up to 24 hours in advance. However, I’d advise holding off on dusting them with powdered sugar until just before serving. Otherwise, the moisture from the filling might make the sugar disappear. Nobody wants invisible sugar! This way, you’ll have a dessert that’s not only delicious but also picture-perfect for your guests. Trust me, they’ll think you slaved away for hours, when really, you were just being smart about your prep time.
How do I store leftover cannoli squares?
If, by some miracle, you find yourself with leftover cannoli squares, you’ll want to store them properly to maintain their delightful texture. Place them in an airtight container in the refrigerator. They’ll stay fresh for up to 3 days. But let’s be honest, they probably won’t last that long! The cool air will help keep the filling firm and the pastry crisp(ish). Just remember, moisture is the enemy, so the airtight container is key. A little tip: you can also try adding a layer of parchment paper between the squares to prevent sticking.
What if I don’t have ricotta cheese? What’s a good substitute for these delicious cannoli squares?
Okay, so you’re staring at the recipe and realize you’re fresh out of ricotta. Don’t panic! A great substitute is mascarpone cheese. It has a similar creamy texture and slightly sweet flavor that works wonderfully in cannoli fillings. Another option is to use a combination of cream cheese (make sure it’s full-fat for the best results) and sour cream to mimic the ricotta’s tanginess. Just be sure to drain any excess liquid from the cream cheese first. It might not be exactly the same, but your dessert will still be delicious and satisfying. Nobody will ever know your little secret!
Can I freeze these cannoli squares?
Freezing these **Classic Cannoli Squares That Will Wow Your Taste Buds** is not something I would recommend. The pastry shell tends to get soggy and the filling can become watery upon thawing. Freshly made is always best when it comes to these delicate treats. However, if you’re determined, you could *try* freezing the filling separately and then assembling the squares after thawing. But honestly, they’re so easy to make that whipping up a fresh batch is usually the better option. Plus, who wants to wait for dessert to thaw when you can have it ready in a snap?

Leave a Comment