
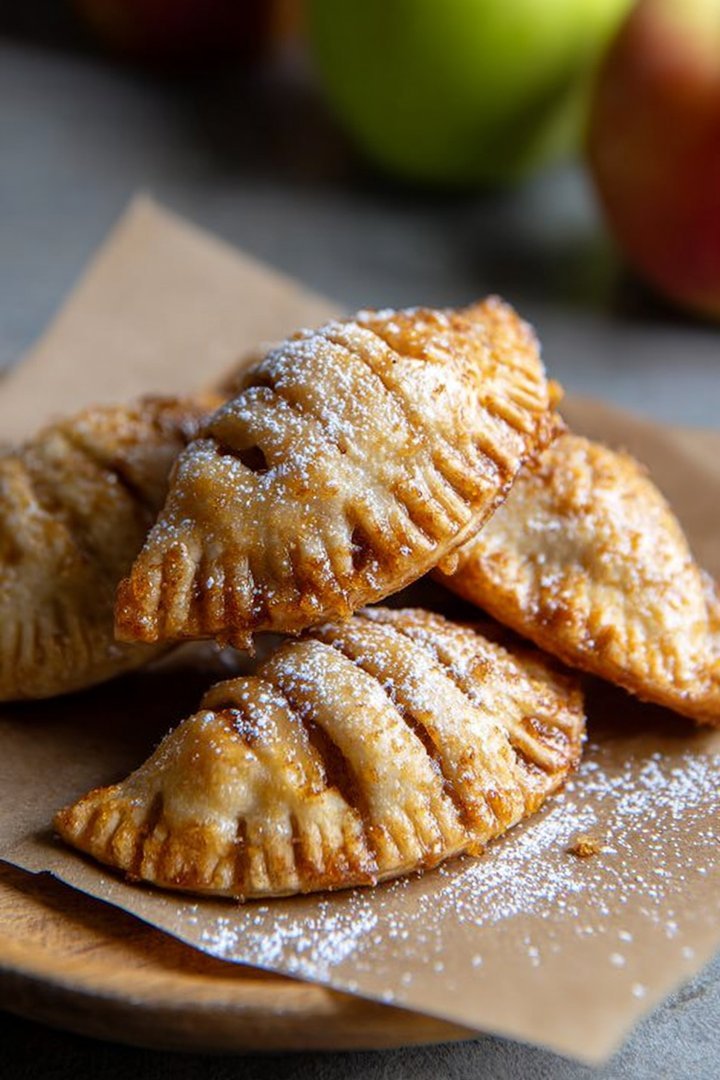
Picture this: the air is crisp, leaves are crunching underfoot, and the aroma of warm apples and cinnamon is wafting through your kitchen. That’s right, it’s time for Apple Hand Pies Fall Dessert, a delightful treat that perfectly captures the essence of the season.
These miniature masterpieces are not just desserts; they’re portable pockets of pure autumnal bliss, ready to warm your soul and tantalize your taste buds. Each bite offers a symphony of sweet and tart flavors, wrapped in a flaky, golden crust, creating an experience that’s both comforting and utterly irresistible.
- These hand pies are surprisingly easy to make, even if you’re not a seasoned baker, making them the perfect fall baking project.
- The combination of sweet apples, warm spices, and buttery crust creates a flavor explosion that embodies the essence of fall.
- Their charming, individual size makes them visually appealing and perfect for serving at gatherings or gifting to loved ones.
- Enjoy them warm with a scoop of vanilla ice cream, a drizzle of caramel, or simply on their own for a versatile treat any time.
Ingredients for Apple Hand Pies Fall Dessert
Here’s what you’ll need to make this delicious dish:
The full ingredients list, including measurements, is provided in the recipe card directly below.
How to Make Apple Hand Pies Fall Dessert
Follow these simple steps to prepare this delicious dish:
Step 1: Prepare the Pie Crust
In a large bowl, whisk together the flour, granulated sugar, and salt. Cut in the cold butter using a pastry blender or your fingers until the mixture resembles coarse crumbs. Gradually add the ice water, mixing until the dough just comes together. Divide the dough in half, flatten each half into a disc, wrap in plastic wrap, and refrigerate for at least 30 minutes. This chill time is essential for a flaky crust!
Step 2: Make the Apple Filling
Peel, core, and dice the apples. In a large saucepan, combine the diced apples, brown sugar, cinnamon, nutmeg, and lemon juice. Cook over medium heat, stirring occasionally, until the apples are softened but still slightly firm, about 8-10 minutes. Stir in the cornstarch and cook for another minute until the filling thickens. Remove from heat and let cool completely. Patience is a virtue here; don’t use warm filling!
Step 3: Assemble the Hand Pies
Preheat oven to 375°F (190°C). On a lightly floured surface, roll out one disc of dough to about 1/8 inch thickness. Use a round cookie cutter or a knife to cut out circles (about 4 inches in diameter). Place a spoonful of the apple filling in the center of each circle. Fold the dough over to form a half-moon shape, pressing the edges to seal. Crimp the edges with a fork for a decorative touch and to ensure they are sealed tightly.
Step 4: Bake the Hand Pies
Place the hand pies on a baking sheet lined with parchment paper. In a small bowl, whisk together the egg and a tablespoon of water to make an egg wash. Brush the tops of the hand pies with the egg wash and sprinkle with turbinado sugar. Cut a few slits in the top of each pie to allow steam to escape. Bake for 20-25 minutes, or until the crust is golden brown.
Step 5: Cool and Serve
Let the hand pies cool on a wire rack for a few minutes before serving. This prevents burning your tongue on molten apple lava!
Step 6: Enjoy
Serve warm on their own or with a scoop of vanilla ice cream for the perfect finishing touch to Apple Hand Pies Fall Dessert.
Perfecting the Cooking Process
To get those perfect, flaky Apple Hand Pies Fall Dessert, start by chilling your dough. While it rests, prepare the apple filling. This method ensures the crust stays tender and doesn’t melt too quickly in the oven. A quick egg wash before baking gives them that gorgeous golden-brown sheen.
Add Your Touch
Feeling adventurous? Swap out some of the apples for pears or cranberries for a unique twist. A sprinkle of cinnamon sugar on top before baking adds extra sweetness and a delightful crunch. You could even add a dash of nutmeg or cardamom to the apple filling for a warmer spice profile.
Storing & Reheating
Store your Apple Hand Pies Fall Dessert in an airtight container at room temperature for up to two days, or in the refrigerator for up to a week. To reheat, warm them in a preheated oven at 350°F (175°C) for about 10-15 minutes, or until heated through. They are best served warm!
3 helpful tips for Perfect Apple Hand Pies:
- Make sure your butter is very cold when making the pie dough; this creates flaky layers that everyone will adore.
- Don’t overfill the pies; too much filling will cause them to burst and the juices will make the crust soggy.
- Use a fork to crimp the edges tightly to seal in all that delicious apple goodness; nobody wants an apple escape!
(Personal anecdote formated as paragraph subheading)
I remember the first time I made these, my niece declared them “better than Grandma’s!” While I think she was just being sweet, it was a total confidence boost, and now they’re a family favorite every autumn.
Let’s Talk Apples: The Heart of the Apple Hand Pies Fall Dessert
Alright, friends, let’s dive into the wonderful world of apples! You see, crafting the quintessential Apple Hand Pies Fall Dessert isn’t just about throwing some fruit into a crust; it’s an art, a science, and maybe a little bit of kitchen magic. Choosing the right apples is paramount. It’s like picking the star players for your culinary team. Some apples are sweet, some are tart, and some just plain refuse to cooperate when baked.
The All-Star Apple Lineup
For the absolute best Apple Hand Pies Fall Dessert experience, you need apples that can hold their own. We’re talking about apples that don’t turn to mush the moment they hit the heat. Varieties like Honeycrisp, Granny Smith, and Braeburn are your MVPs. Honeycrisp brings a lovely sweetness and a satisfying crunch, Granny Smith offers that delightful tartness to balance the sweetness, and Braeburn provides a complex flavor that deepens as it bakes.
Blending different apple varieties is where the real fun begins. Imagine combining the tartness of Granny Smith with the sweetness of Honeycrisp. It’s like a perfectly balanced symphony of flavors in every bite. Don’t be afraid to experiment. Maybe throw in a few Fuji apples for extra sweetness or some Pink Ladies for a hint of tang. The possibilities are endless!
Apple Prep: The Unsung Hero
Now that you’ve got your star-studded apple lineup, it’s time to get them prepped. This is where a little bit of elbow grease comes in handy. Peel, core, and dice those apples into uniform pieces. Consistency is key here. You don’t want some pieces to be perfectly cooked while others are still crunchy.
Toss the diced apples with a mixture of sugar, cinnamon, nutmeg, and a touch of lemon juice. The sugar sweetens the apples, the cinnamon and nutmeg add that warm, autumnal spice, and the lemon juice prevents the apples from browning and brightens the flavors. Let the mixture sit for about 15-20 minutes to allow the apples to release some of their juices. This creates a luscious, syrupy sauce that will make your hand pies absolutely irresistible.
Crafting the Perfect Crust: The Foundation of a Delicious Apple Hand Pies Fall Dessert
Let’s be honest, the crust can make or break an Apple Hand Pies Fall Dessert. A soggy, bland crust is a culinary crime. But a flaky, buttery crust that melts in your mouth? That’s pure heaven. The secret to a perfect crust is all about cold ingredients and minimal handling.
The Cold Truth About Crusts
Start with ice-cold butter and shortening. I like to cube them and then pop them in the freezer for about 15 minutes before using. This ensures that the fats stay solid and create those beautiful, flaky layers as they melt in the oven. Use ice water to bring the dough together. Add it gradually, a tablespoon at a time, until the dough just comes together. Overworking the dough will develop the gluten and result in a tough crust.
Once the dough comes together, flatten it into a disc, wrap it in plastic wrap, and chill it in the refrigerator for at least 30 minutes. This allows the gluten to relax and makes the dough easier to roll out. Chilling the dough is not optional; it’s a must-do for a tender, flaky crust.
Rolling and Shaping: The Art of Hand Pies
When you’re ready to assemble your Apple Hand Pies Fall Dessert, roll out the dough on a lightly floured surface to about 1/8-inch thickness. Use a round cookie cutter or a knife to cut out circles of dough. Place a spoonful of the apple filling in the center of each circle, leaving a little space around the edges.
Fold the dough over the filling to create a half-moon shape. Crimp the edges with a fork to seal them tightly. This prevents the filling from leaking out during baking and creates a pretty decorative edge. Before baking, brush the hand pies with an egg wash (an egg beaten with a little water or milk) for a golden-brown finish. Cut a few slits in the top of each pie to allow steam to escape.
Baking to Perfection: Achieving Apple Hand Pies Fall Dessert Nirvana
You’ve prepped the apples, crafted the crust, and assembled your hand pies. Now, it’s time for the grand finale: baking! Preheat your oven to 375°F (190°C). Place the hand pies on a baking sheet lined with parchment paper. This prevents them from sticking and makes cleanup a breeze.
Bake for about 20-25 minutes, or until the crust is golden brown and the filling is bubbly. Keep a close eye on them during baking. If the crust starts to brown too quickly, tent them with foil to prevent burning.
The Cooling Process: Patience is a Virtue
Once the hand pies are golden brown and bubbling, remove them from the oven and let them cool on a wire rack for at least 15-20 minutes before serving. This allows the filling to set and prevents you from burning your tongue. Trust me, patience is a virtue when it comes to enjoying these delicious Apple Hand Pies Fall Dessert.
While the pies are cooling, you can whip up a simple glaze by whisking together powdered sugar with a little bit of milk or lemon juice. Drizzle the glaze over the cooled hand pies for an extra touch of sweetness and elegance.
Serving Suggestions: Elevating Your Apple Hand Pies Fall Dessert Experience
These Apple Hand Pies Fall Dessert are delicious on their own, but they’re even better with a few simple accompaniments. A scoop of vanilla ice cream or a dollop of whipped cream is the perfect complement to the warm, spiced apple filling. A sprinkle of cinnamon or a drizzle of caramel sauce adds a touch of elegance.
Serve these hand pies at your next fall gathering or enjoy them as a cozy treat on a chilly evening. They’re guaranteed to be a hit with family and friends.
Beyond the Basics: Creative Serving Ideas
Feeling adventurous? Try serving these Apple Hand Pies Fall Dessert with a side of cheddar cheese. The sharp, savory cheese pairs surprisingly well with the sweet, spiced apple filling. For a more sophisticated presentation, arrange the hand pies on a platter with fresh berries and a sprig of mint.
These hand pies are also perfect for gifting. Wrap them individually in cellophane bags and tie them with a ribbon for a thoughtful and delicious present. Share the love and spread the Apple Hand Pies Fall Dessert joy!
Troubleshooting Tips: Conquering Common Challenges
Even the most experienced bakers encounter challenges from time to time. Here are a few troubleshooting tips to help you conquer common Apple Hand Pies Fall Dessert problems:
- Soggy crust: Make sure your butter and shortening are very cold and don’t overwork the dough.
- Burnt crust: Tent the hand pies with foil during baking to prevent the crust from browning too quickly.
- Filling leaking out: Crimp the edges of the hand pies tightly with a fork to seal them properly.
- Dry filling: Add a tablespoon or two of apple juice or cider to the filling for extra moisture.
Don’t Be Afraid to Experiment: The Joy of Culinary Creation
Ultimately, the best way to perfect your Apple Hand Pies Fall Dessert is to experiment and have fun! Don’t be afraid to try different apple varieties, spices, or crust recipes. The possibilities are endless, and the journey is just as rewarding as the destination. So, gather your ingredients, put on your apron, and get baking!
Conclusion for Apple Hand Pies Fall Dessert :
These Apple Hand Pies Fall Dessert are a surefire way to win hearts and impress taste buds. Their blend of flaky crust, warm, spiced apple filling, and customizable sweetness make them a standout treat. Don’t hesitate to experiment with different apple varieties and serving suggestions to make them your own. So go ahead, embrace the cozy flavors of autumn and whip up a batch of these delightful hand pies. They are the perfect snack for your next gathering!
Print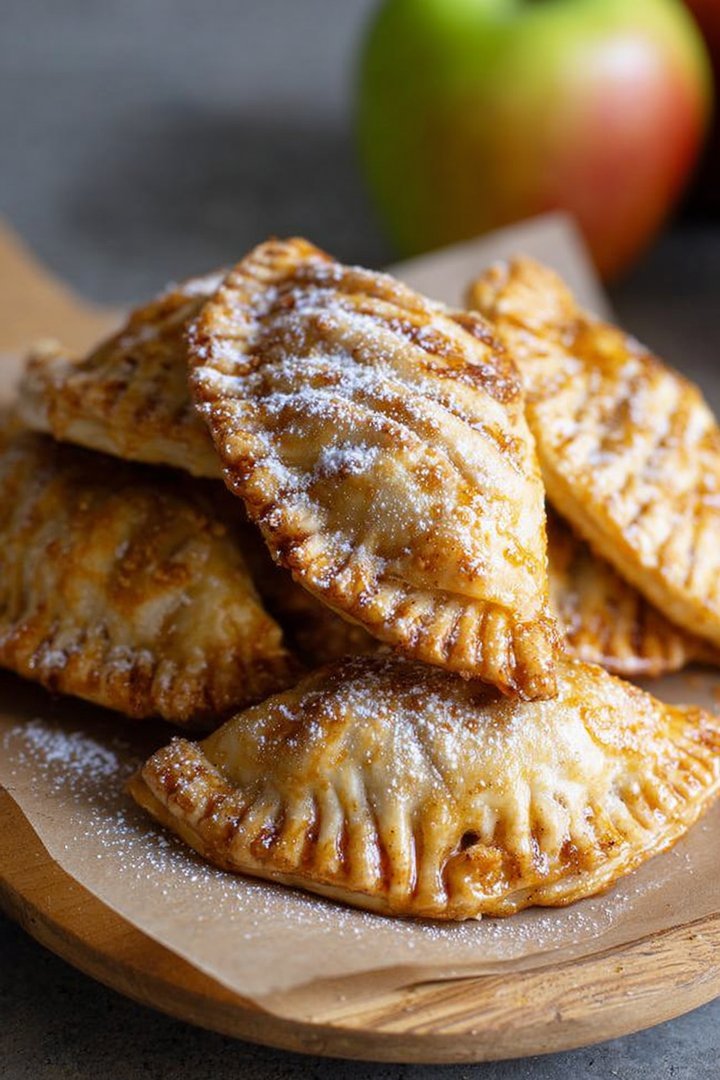
Apple Hand Pies Fall Dessert
Delicious apple hand pies fall dessert recipe with detailed instructions and nutritional information.
- Total Time: 35 minutes
- Yield: 4 servings
Ingredients
- All-purpose flour: 2 1/2 cups
- Cold unsalted butter: 1 cup (2 sticks), cut into cubes
- Ice water: 1/2 cup to 3/4 cup
- Apples (Granny Smith or Honeycrisp): 4 medium, peeled, cored, and diced
- Granulated sugar: 1/2 cup
- Ground cinnamon: 1 teaspoon
- Lemon juice: 1 tablespoon
- Egg: 1 large, beaten (for egg wash)
Instructions
- Step 1: Make the pie dough: In a large bowl, whisk together the flour and a pinch of salt. Cut in the cold butter using a pastry blender or your fingers until the mixture resembles coarse crumbs. Gradually add ice water, one tablespoon at a time, mixing until the dough just comes together. Divide the dough in half, flatten each into a disc, wrap in plastic wrap, and refrigerate for at least 30 minutes.
- Step 2: Prepare the apple filling: In a medium saucepan, combine the diced apples, granulated sugar, cinnamon, and lemon juice. Cook over medium heat, stirring occasionally, until the apples are softened and the juices have thickened slightly, about 8-10 minutes. Remove from heat and let cool completely.
- Step 3: Assemble the hand pies: Preheat oven to 375°F (190°C). On a lightly floured surface, roll out one disc of dough to about 1/8 inch thickness. Use a cookie cutter or knife to cut out circles (about 4 inches in diameter). Repeat with the second disc of dough.
- Step 4: Fill and seal: Place a spoonful of the cooled apple filling in the center of each circle. Fold the dough over to form a half-moon shape. Crimp the edges with a fork to seal. Cut a few slits in the top of each hand pie to allow steam to escape.
- Step 5: Bake: Place the hand pies on a baking sheet lined with parchment paper. Brush the tops with the beaten egg. Bake for 20-25 minutes, or until golden brown. Let cool slightly before serving.
Notes
- Store cooled hand pies in an airtight container at room temperature for up to 2 days or in the refrigerator for up to 4 days.
- For a warm, crisp hand pie, reheat in a 350°F (175°C) oven for about 5-10 minutes.
- Serve these delightful hand pies with a scoop of vanilla ice cream or a drizzle of caramel sauce for extra indulgence.
- For the flakiest crust, ensure your butter and ice water are very cold when making the dough.
- Prep Time: 15 minutes
- Cook Time: 20 minutes
- Method: Stovetop
- Cuisine: American
FAQs :
Can I use different apples for these Apple Hand Pies Fall Dessert?
Absolutely! The beauty of this recipe lies in its adaptability. While I personally adore using a mix of Honeycrisp and Granny Smith for that sweet-tart balance, feel free to experiment. Braeburn, Gala, or even Fuji apples would work wonderfully. Just keep in mind that some apples soften more than others during baking, so adjust your cooking time accordingly. The goal is tender, not mushy! Don’t be afraid to get creative and discover your own favorite apple combination for these delightful hand pies.
How do I prevent the Apple Hand Pies Fall Dessert from getting soggy?
Soggy bottoms are the bane of every baker’s existence! To combat this, ensure your oven is preheated correctly and bake the hand pies on the lowest rack. This will help the bottom crust cook more thoroughly. Also, avoid overfilling the pies with the apple mixture, as excess moisture can seep into the crust. Consider blind-baking the pie crusts for a few minutes before adding the filling for extra insurance against sogginess. A light egg wash on the crust before baking can also create a protective barrier.
Can I make these Apple Hand Pies Fall Dessert ahead of time?
You can certainly prep components in advance! The apple filling can be made a day or two ahead and stored in the refrigerator. Similarly, the pie crust dough can be made, wrapped tightly, and refrigerated for up to three days. When you’re ready to assemble, just roll out the dough, fill, and bake. Baked hand pies are best enjoyed fresh, but they can be stored in an airtight container at room temperature for a day or two. Reheat them slightly in the oven for that just-baked warmth and flaky crust.
What can I serve with these Apple Hand Pies Fall Dessert?
These apple hand pies are delicious on their own, but a little something extra never hurts! A scoop of vanilla ice cream is a classic pairing that complements the warm, spiced apple filling perfectly. Alternatively, a dollop of whipped cream or a drizzle of caramel sauce adds a touch of indulgence. For a lighter option, consider serving them with a sprinkle of powdered sugar or a side of Greek yogurt. A warm cup of coffee or tea is the perfect accompaniment for a cozy fall treat.


Leave a Comment