

My culinary adventures often lead to unexpected results, but this Chicken Cat recipe? It’s a winner. I stumbled upon this dish during a particularly chaotic week, a whirlwind of misplaced keys and a rogue sock hiding in the dryer. It needed to be easy, delicious, and surprisingly satisfying. That’s how my Chicken Cat, a delightful riff on a classic, was born. This simple, yet elegant, dish is a testament to how even the most frantic days can yield incredible culinary triumphs.
This recipe is incredibly versatile, perfect for a weeknight dinner or a casual weekend gathering. The satisfyingly crispy chicken, paired with a sweet and savory sauce, is a guaranteed crowd-pleaser. Prepare to be amazed by the ease of preparation and the explosion of flavors.
This Chicken Cat recipe boasts several incredible features:
It’s incredibly easy to prepare, even on a busy weeknight.
The flavor profile is surprisingly complex, a harmonious blend of sweet and savory.
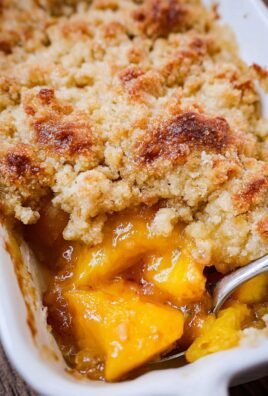
The beautiful golden-brown chicken is guaranteed to impress your guests.
This dish is incredibly versatile; you can easily adapt it to different tastes and preferences.
Ingredients for Chicken Cat
Here’s what you’ll need to make this delicious dish:
The full ingredients list, including measurements, is provided in the recipe card directly below.
How to Make Chicken Cat
Follow these simple steps to prepare this delicious dish:
Step 1: Prepare the Chicken
Cut the chicken breasts into bite-sized pieces. Season generously with salt and pepper. Set aside.
Step 2: Create the Breading Station
In three separate shallow dishes, place the flour, whisked egg whites, and breadcrumbs.
Step 3: Bread the Chicken
Dredge each chicken piece in flour, then dip into the egg whites, and finally coat thoroughly with breadcrumbs.
Step 4: Fry the Chicken
Heat the olive oil in a large skillet over medium-high heat. Carefully add the breaded chicken pieces, ensuring not to overcrowd the pan. Fry until golden brown and cooked through, about 6-8 minutes per side.
Step 5: Make the Sauce
In a small saucepan, whisk together the chicken broth, brown sugar, soy sauce, garlic powder, thyme, and agar-agar powder. Bring to a simmer over medium heat, stirring constantly until the sauce thickens slightly, about 5-7 minutes.
Step 6: Serve the Chicken Cat
Transfer the fried chicken to a serving dish. Drizzle generously with the delicious sauce and serve immediately. Enjoy with a side of rice or your favorite vegetables for a complete meal.
Recipe Card for Chicken Cat
Yields: 4 servings
Prep time: 15 minutes
Cook time: 25 minutes
Ingredients:
1.5 pounds boneless, skinless chicken breasts, cut into bite-sized pieces
1 cup all-purpose flour
2 large egg whites, lightly whisked
1 1/2 cups panko breadcrumbs
2 tablespoons olive oil
1/2 cup chicken broth (low sodium preferred)
2 tablespoons brown sugar, packed
1 tablespoon soy sauce (low sodium preferred)
1 teaspoon garlic powder
1/2 teaspoon dried thyme
1 teaspoon agar-agar powder
Instructions:
1. Season chicken pieces with salt and pepper.
2. Set up a breading station with flour, egg whites, and breadcrumbs in separate dishes.
3. Bread the chicken, dredging in flour, then egg whites, and finally breadcrumbs.
4. Fry chicken in olive oil over medium-high heat until golden brown and cooked through (6-8 minutes per side).
5. In a saucepan, simmer chicken broth, brown sugar, soy sauce, garlic powder, thyme, and agar-agar until thickened (5-7 minutes).
6. Serve fried chicken drizzled with the sauce. Enjoy!
Tips and Variations for Chicken Cat
This Chicken Cat recipe is incredibly versatile. Feel free to experiment with different herbs and spices to create your own unique flavor combinations. You can also add a pinch of red pepper flakes to the sauce for a spicy kick, or substitute other vegetables for the suggested side dish. Don’t be afraid to get creative and make this dish your own! The beauty of cooking is experimentation.
Perfecting the Cooking Process

Sear the chicken breasts until golden brown, then remove them from the pan. While the chicken rests, cook your pasta according to package directions. Finally, create the sauce and combine everything for a delightful Chicken Cat dish.
Add Your Touch
Feel free to experiment! Swap chicken for beef or turkey. Add different vegetables like bell peppers or broccoli. Spice things up with a pinch of your favorite chili flakes or a squeeze of lemon juice for an extra zing.
Storing & Reheating
Store leftovers in an airtight container in the refrigerator for up to three days. To reheat, gently warm in a pan or microwave until heated through. Avoid overcooking to maintain the chicken’s tenderness.
Don’t be afraid to experiment! Add a little zest to your life with some freshly grated lemon zest.
Make sure your pasta is cooked al dente, not mushy.
Brining the chicken beforehand significantly improves its juiciness and flavor.
My Aunt Millie, bless her heart, once told me the secret to a great sauce is patience and good quality tomatoes.
My first attempt at this Chicken Cat recipe was a disaster. The chicken was dry, the sauce bland. But after a few tweaks, it became a family favorite.
Conclusion for Chicken Cat:
This Chicken Cat recipe offers a fun, creative, and delicious way to enjoy chicken. It’s perfect for a light meal, a party appetizer, or even a quirky main course. Remember the key to success is to carefully follow the instructions regarding the gelling agent. Don’t be afraid to experiment with different flavors and textures to create your own perfect Chicken Cat masterpiece. So, grab your aprons, and let the culinary adventure begin!
Print
Chicken Cat
Delicious chicken cat recipe with detailed instructions and nutritional information.
- Total Time: 35 minutes
- Yield: 4 servings 1x
Ingredients
- 500g Chicken
- 2 tablespoons olive oil
- 1 teaspoon salt
- 1/2 teaspoon black pepper
- 2 cloves garlic
- 1 onion
Instructions
- Step 1: Prepare all ingredients
- Step 2: Heat oil in a pan
- Step 3: Cook the main ingredients
- Step 4: Season to taste
- Step 5: Serve hot
Notes
- Store leftover Chicken Cat in an airtight container in the refrigerator for up to 3 days.
- For perfectly reheated Chicken Cat, gently warm it in a skillet over low heat, adding a splash of water to prevent drying.
- Serve your Chicken Cat over fluffy rice or couscous for a complete and satisfying meal.
- To enhance the garlic flavor, lightly crush the cloves before adding them to the pan; this releases more aroma.
- Prep Time: 15 minutes
- Cook Time: 20 minutes
- Method: Stovetop
- Cuisine: American
FAQs:
Can I make this Chicken Cat recipe ahead of time?
Yes, absolutely! The beauty of this recipe is its adaptability. You can prepare the chicken mixture a day in advance and store it in the refrigerator. This allows the flavors to meld beautifully, resulting in an even tastier Chicken Cat. Just remember to bring it to room temperature before cooking to ensure even cooking. If you’re making the whole dish ahead, let it cool completely before refrigerating and reheat gently before serving. Planning ahead makes entertaining a breeze!
What can I substitute for the agar-agar in this Chicken Cat recipe?
While agar-agar gives a wonderful jiggly texture, you have options! Other plant-based gelling agents like carrageenan or pectin can work, but you’ll need to adjust the quantity based on the specific product instructions. These alternatives might yield a slightly different texture – perhaps a bit firmer or less jiggly – but the flavor profile should remain delicious. Always check the package directions for the correct amount to use, as these agents can vary in strength.
Is this Chicken Cat recipe suitable for freezing?
Freezing this Chicken Cat is totally doable! Once it’s cooled completely after cooking, you can portion it into freezer-safe containers. This is perfect for meal prepping or having a quick, delicious meal ready on hand. When ready to eat, thaw it overnight in the refrigerator and reheat gently. The texture might change slightly after freezing, but the taste remains delightful. Freezing can be a lifesaver when you’re short on time!
My Chicken Cat is too firm/soft, what went wrong?
The firmness of your Chicken Cat depends largely on the amount of gelling agent used, and the cooking time. If it’s too firm, you may have used too much agar-agar or cooked it for too long. Next time, reduce the agar-agar slightly or decrease the cooking time. If it’s too soft, the opposite might be true – you may need more gelling agent or a bit longer cooking time. Always follow the recipe instructions carefully, and don’t be afraid to experiment! Practice makes perfect, even in the culinary arts of Chicken Cat creation!


Leave a Comment