
Imagine biting into a crispy, golden sliver of potato, the satisfying crunch echoing in your ears. That simple pleasure, that moment of pure potato bliss, is what we’re chasing with these **Classic Potato Chips Fried to Golden Perfection**.
Forget the store-bought bags filled with air and disappointment. We’re diving headfirst into the world of homemade chips, where you control the crisp, the salt, and the sheer potato perfection. These chips are so good, they might just inspire you to finally clean out that forgotten corner of your pantry – just so you can have more room to store potatoes!
Here are a few reasons why you’ll be ditching the bagged stuff forever:
- Effortlessly crafted from scratch, transforming humble potatoes into a delightful snack with minimal fuss.
- Achieves an unparalleled flavor profile, striking a harmonious balance between salty goodness and rich potato essence.
- Boasts an irresistible visual appeal, showcasing a mesmerizing golden hue and perfectly crinkled edges that entice every eye.
- Offers unparalleled versatility, complementing an array of culinary creations from sandwiches to elegant appetizers with a satisfying crunch.
Ingredients for Classic Potato Chips Fried to Golden Perfection
Here’s what you’ll need to make this delicious dish:
The full ingredients list, including measurements, is provided in the recipe card directly below.
How to Make Classic Potato Chips Fried to Golden Perfection
Follow these simple steps to prepare this delicious dish:
Step 1: Slice the Potatoes Thinly
Use a mandoline or a very sharp knife to slice the potatoes into thin, even slices about 1/16 inch thick. Consistency is key for even cooking! Think of it as potato chip precision.
Step 2: Soak the Potato Slices
Place the sliced potatoes in a large bowl of cold water with a splash of white vinegar. Soak for at least 30 minutes, or up to 2 hours. This removes excess starch, resulting in crispier chips. Change the water a couple of times during soaking.
Step 3: Heat the Oil
Pour about 2 inches of vegetable oil into a large, heavy-bottomed pot or deep fryer. Heat the oil over medium-high heat to 350°F (175°C). Use a candy thermometer to monitor the temperature. Hot oil is your friend, but dangerously hot oil is not, so be careful.
Step 4: Fry the Potato Chips
Carefully add the potato slices to the hot oil in batches, making sure not to overcrowd the pot. Fry for 3-5 minutes, or until the chips are golden brown and crispy, stirring occasionally.
Step 5: Drain and Season
Remove the chips from the oil with a slotted spoon and place them on a wire rack lined with paper towels to drain. Immediately sprinkle with salt while they are still hot.
Step 6: Enjoy!
Let the chips cool slightly before serving. These **classic potato chips fried to golden perfection** are best enjoyed fresh, but can be stored in an airtight container for up to 3 days (if they last that long!). Serve alongside your favorite sandwich, dip, or enjoy them all on their own.
Variations and Tips for Classic Potato Chips Fried to Golden Perfection (formated as H2 subheading)
These **classic potato chips fried to golden perfection** are a blank canvas for flavor experimentation!
Seasoning Sensations (formated as H3 subheading)
Don’t limit yourself to just salt! While a simple salted chip is a thing of beauty, feel free to get creative. Dust your freshly fried chips with garlic powder, onion powder, smoked paprika, or even a pinch of cayenne pepper for a little kick. For a sweet and savory twist, try a light dusting of brown sugar and cinnamon.
Oil Options (formated as H3 subheading)
While vegetable oil is a great all-around choice, experimenting with different oils can add subtle flavor nuances. Coconut oil will impart a slightly sweet flavor, while avocado oil offers a richer, more buttery taste.
Achieving Maximum Crispness (formated as H3 subheading)
The secret to truly crispy chips lies in removing as much moisture as possible. After soaking and draining the potato slices, pat them dry with paper towels before frying. This extra step makes a world of difference.
Serving Suggestions to Elevate your Classic Potato Chips Fried to Golden Perfection (formated as H3 subheading)
Don’t just limit yourself to snacking on these beauties straight from the bowl!
Chip and Dip Extravaganza (formated as H4 subheading)
Elevate your chip-and-dip game with homemade creations. Whip up a batch of creamy French onion dip, a spicy guacamole, or a tangy tzatziki sauce. The possibilities are endless!
Sandwich Superstar (formated as H4 subheading)
Add a satisfying crunch to your sandwiches by layering in a few of these chips. They’re especially delicious with turkey and avocado or a classic grilled cheese.
Crumbled Toppings (formated as H4 subheading)
Crush the chips and use them as a crunchy topping for salads, casseroles, or even mac and cheese. They add a delightful textural contrast and a burst of salty flavor.
Why These Classic Potato Chips Fried to Golden Perfection Are Better Than Store-Bought (formated as H2 subheading)
Let’s face it, the pre-packaged chips lining the grocery store shelves just don’t compare to the satisfaction of homemade. Here’s why:
Control Over Ingredients (formated as H3 subheading)
When you make your own chips, you know exactly what’s going into them. No mysterious preservatives, artificial flavors, or excessive salt. Just simple, wholesome ingredients.
Freshness Factor (formated as H3 subheading)
There’s nothing quite like the taste of freshly fried potato chips. The crispness is unparalleled, and the flavor is simply more vibrant. Store-bought chips, on the other hand, can often taste stale or slightly cardboard-y.
Customization Capabilities (formated as H3 subheading)
With homemade chips, you have the freedom to experiment with different flavors and seasonings to create your perfect chip. The possibilities are endless!
The Sheer Satisfaction (formated as H3 subheading)
There’s a certain sense of accomplishment that comes with making your own potato chips from scratch. It’s a rewarding experience that connects you to the food you’re eating.
Troubleshooting Common Potato Chip Frying Issues (formated as H2 subheading)
Even with the best intentions, sometimes things can go awry in the kitchen. Here are some common potato chip frying issues and how to fix them:
Soggy Chips (formated as H3 subheading)
If your chips are turning out soggy, it’s likely due to one of two things: not enough starch removal or oil that isn’t hot enough. Make sure to soak the potato slices for at least 30 minutes and ensure the oil temperature is consistently around 350°F (175°C).
Burnt Chips (formated as H3 subheading)
Burnt chips are usually a sign that the oil is too hot or that you’re overcrowding the pot. Reduce the heat and fry the chips in smaller batches to ensure even cooking.
Unevenly Cooked Chips (formated as H3 subheading)
Unevenly cooked chips can be caused by inconsistent slicing or not stirring the chips frequently enough during frying. Use a mandoline or a very sharp knife to slice the potatoes into uniform thickness and stir occasionally to ensure all sides are cooked evenly.
Chips Sticking Together (formated as H3 subheading)
Chips sticking together can happen if they aren’t properly dried after soaking. Pat the slices dry with paper towels before frying.
Serving Suggestions for Classic Potato Chips Fried to Golden Perfection (formated as H2 subheading)
Beyond just snacking, these chips are incredibly versatile!
Gourmet Garnishes (formated as H3 subheading)
Sprinkle with truffle salt or a drizzle of balsamic glaze for an elevated snacking experience.
The Ultimate Charcuterie Board Addition (formated as H3 subheading)
Arrange these chips alongside cheeses, cured meats, and olives for a sophisticated appetizer spread.
Lunchbox Delight (formated as H3 subheading)
Pack a small bag of these homemade chips in your lunchbox for a satisfying and crunchy side.
Conclusion: Embrace the Potato Chip Perfection (formated as H2 subheading)
So, are you ready to ditch the store-bought bags and embark on a **classic potato chips fried to golden perfection** adventure? With a few simple ingredients and a little patience, you can create chips that are far superior in taste, texture, and overall satisfaction. Get ready to experience potato chip bliss like never before! These aren’t just chips; they’re a testament to the power of homemade goodness.
Alright, buckle up buttercups, because we’re diving headfirst into the world of crispy, crunchy, salty goodness! We’re talking about *the* snack food, the one that disappears faster than free samples at a cheese convention: Classic Potato Chips Fried to Golden Perfection.
Selecting Your Spuds
Listen, folks, not all potatoes are created equal. Some are destined for mashed potato mountains, others for creamy soups, but for Classic Potato Chips Fried to Golden Perfection, we need the right kind. Russets are your best bet. Their high starch content is key to achieving that desirable crispiness. Yukon Golds will also work, offering a slightly sweeter, more buttery flavor. Avoid waxy potatoes like red potatoes; they will result in soggy chips, and nobody wants that.
Slicing Like a Pro
This is where things get interesting. You want uniform slices, about 1/16th of an inch thick. Why? Because consistency is king when striving for that perfect golden brown. A mandoline slicer is your friend here, but if you’re feeling brave (and careful!), a sharp chef’s knife will do the trick. Just take your time and aim for evenness. Nobody wants some chips burnt to a crisp while others are still pale and sad.
The Starch Solution
Now, this is crucial. Once your potatoes are sliced, rinse them in cold water. And I mean *really* rinse them. Keep changing the water until it runs clear. This removes excess starch, preventing the chips from sticking together and ensuring maximum crispness. Some folks even soak the slices in ice water for 30 minutes to an hour for extra insurance. Trust me, it’s worth the effort.
Drying is Key
Before they even *think* about hitting that hot oil, those potato slices need to be bone dry. Spread them out on clean kitchen towels and pat them thoroughly. You can even let them air dry for a bit. Any moisture left on those slices is going to create steam in the oil, leading to less-than-crispy results.
Oil Me Up, Buttercup!
Alright, time for the star of the show: the oil. Peanut oil is fantastic for frying because of its high smoke point and neutral flavor. Canola or sunflower oil also work well. Avoid olive oil; its lower smoke point will lead to smoky, potentially bitter chips. Fill a heavy-bottomed pot or deep fryer with about 3 inches of oil and heat it to 350°F (175°C). Use a thermometer; guessing here is a recipe for disaster.
Frying in Batches
Do *not* overcrowd the pot! Frying in small batches ensures the oil temperature stays consistent, which is essential for even cooking. Add the potato slices in a single layer, being careful not to let them clump together. Fry for about 5-7 minutes, or until they are golden brown and crispy.
The Golden Rule of Salting
As soon as you remove the chips from the oil, place them on a wire rack lined with paper towels to drain excess oil. Now, this is important: season them immediately with salt. The salt will adhere better to the hot, oily chips. Don’t be shy, but don’t go overboard either. Sea salt or kosher salt are excellent choices for a clean, salty flavor.
Repeat and Rejoice!
Continue frying in batches until all your potato slices are transformed into Classic Potato Chips Fried to Golden Perfection. Resist the urge to eat them all immediately (I know it’s hard!). Let them cool slightly before diving in.
Perfecting the Cooking Process

To ensure the chips are cooked evenly, frying in batches is important because overcrowding lowers the oil’s temperature. Always drain and salt chips immediately after frying to achieve maximum flavor.
Add Your Touch
Feeling adventurous? Try adding different seasonings after frying. Paprika, garlic powder, onion powder, or even a sprinkle of chili powder can take your chips to the next level. A dash of vinegar powder can also mimic popular flavors.
Storing & Reheating
Store your Classic Potato Chips Fried to Golden Perfection in an airtight container at room temperature to maintain their crispness. Reheating isn’t really recommended, but if you must, a quick bake in a low-temperature oven (200°F or 93°C) for a few minutes can help.
Here are some tips for chip-tastic success:
- Make sure to slice your potatoes evenly for uniform cooking; a mandoline slicer is your best friend for this task.
- Soaking the potato slices in ice water for at least 30 minutes removes excess starch, preventing the chips from sticking together.
- Maintain a consistent oil temperature by using a thermometer and adjusting the heat as needed throughout the frying process.
(Personal anecdote formated as paragraph subheading)
I remember the first time I made these for a family barbecue. Everyone thought I bought them! The look on their faces when I said, “Nope, homemade!” was priceless, pure chip-envy.
Conclusion for Classic Potato Chips Fried to Golden Perfection :
These homemade potato chips are seriously addictive. You’ll be shocked at how easy it is to create crispy, golden, flavor-packed chips that are way better than anything you can buy in a bag. Remember to soak those potato slices to remove excess starch, maintain a consistent oil temperature for optimal crispness, and don’t be shy about experimenting with different seasonings. So, grab some spuds, crank up the heat, and get ready to experience potato chip perfection. Enjoy your freshly fried batch!
Print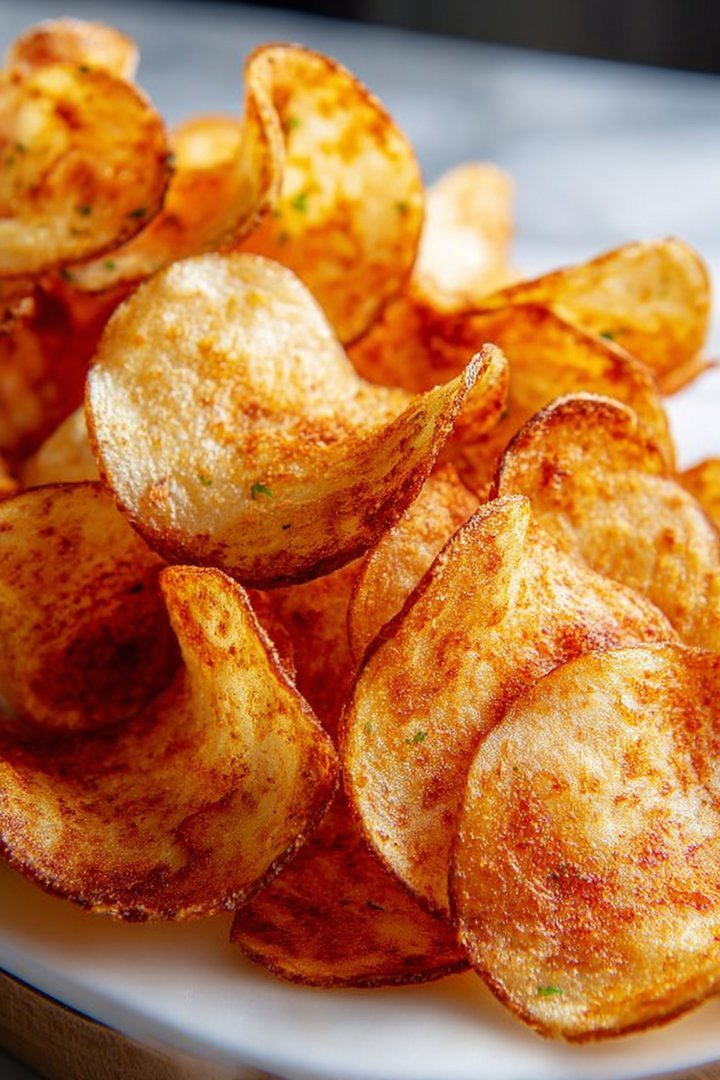
Classic Potato Chips Fried to Golden Perfection
Delicious classic potato chips fried to golden perfection recipe with detailed instructions and nutritional information.
- Total Time: 35 minutes
- Yield: 4 servings
Ingredients
- Russet potatoes: 2 large
- Vegetable oil: 4 cups
- Salt: 1-2 teaspoons, or to taste
- White vinegar: 1 tablespoon
- Ice: 2 cups
- Water: Enough to cover the potatoes
- Paper towels: As needed
Instructions
- Step 1: Wash and peel the potatoes. Slice them very thinly (about 1/16 inch thick) using a mandoline or a very sharp knife. Consistent thickness is key for even cooking.
- Step 2: Place the sliced potatoes in a large bowl filled with ice water and the vinegar. Let them soak for at least 30 minutes, or up to 2 hours, to remove excess starch.
- Step 3: Drain the potatoes thoroughly and rinse them under cold water. Pat them completely dry with paper towels. This step is crucial to prevent splattering and ensure crispy chips.
- Step 4: Heat the vegetable oil in a large, heavy-bottomed pot or deep fryer to 325°F (160°C). Use a thermometer to monitor the temperature.
- Step 5: Fry the potatoes in small batches, being careful not to overcrowd the pot. Fry for about 4-6 minutes per batch, until golden brown and crispy.
- Step 6: Remove the chips with a slotted spoon or spider and place them on a plate lined with paper towels to drain excess oil. Sprinkle immediately with salt while they're still hot. Let cool completely before serving.
Notes
- Store cooled chips in an airtight container to maintain their crispness.
- For a quick refresh, spread slightly softened chips on a baking sheet and crisp them in a 350°F oven for a few minutes.
- Serve these homemade chips with your favorite dip, or simply enjoy them as a satisfying snack.
- Chef's tip: Soaking the potato slices in ice water with vinegar is essential for extra-crispy chips by removing starch and preventing discoloration.
- Prep Time: 15 minutes
- Cook Time: 20 minutes
- Method: Stovetop
- Cuisine: American
FAQs :
What makes these Classic Potato Chips Fried to Golden Perfection so special?
Well, let me tell you, it all starts with the right potato. We’re talking about potatoes that practically beg to be sliced and sizzled. But the real magic? It’s in the frying technique. We’re not just tossing them into hot oil; we’re coaxing them, whispering sweet nothings until they transform into crispy, golden delights. Each bite is a symphony of salty, crunchy perfection that will make your taste buds sing! Prepare yourself for potato chip nirvana.
How can I achieve maximum crispness when making Classic Potato Chips Fried to Golden Perfection?
Ah, crispiness. The holy grail of homemade chips! The secret lies in removing excess starch. Slice your potatoes thinly and soak them in cold water for at least 30 minutes (or even longer!). This draws out the starch, preventing the chips from sticking together and ensuring they crisp up beautifully in the hot oil. Also, make sure your oil temperature is consistent. Too low, and you’ll get soggy chips. Too high, and they’ll burn before they crisp. Patience, my friend, is key.
Can I add different seasonings to my Classic Potato Chips Fried to Golden Perfection?
Absolutely! That’s the beauty of making your own chips – you’re the boss! A simple sprinkle of sea salt is classic for a reason, but don’t be afraid to get creative. Smoked paprika adds a smoky depth, garlic powder provides a savory kick, and a pinch of cayenne pepper brings the heat. Consider adding dried herbs like rosemary or thyme for an earthy aroma. Just remember to season them immediately after they come out of the fryer, while they’re still hot and the seasoning will adhere.
What type of oil is best for frying Classic Potato Chips Fried to Golden Perfection?
Choosing the right oil is crucial for that perfect crunch. You want an oil with a high smoke point, meaning it can withstand high temperatures without breaking down and imparting a funky flavor. Canola oil, peanut oil, or sunflower oil are all excellent choices. Avoid olive oil, as its lower smoke point can result in greasy, less-than-perfect chips. Remember, fresh, clean oil is your friend. Don’t reuse oil that’s been used for other frying endeavors; it’ll affect the taste.


Leave a Comment