

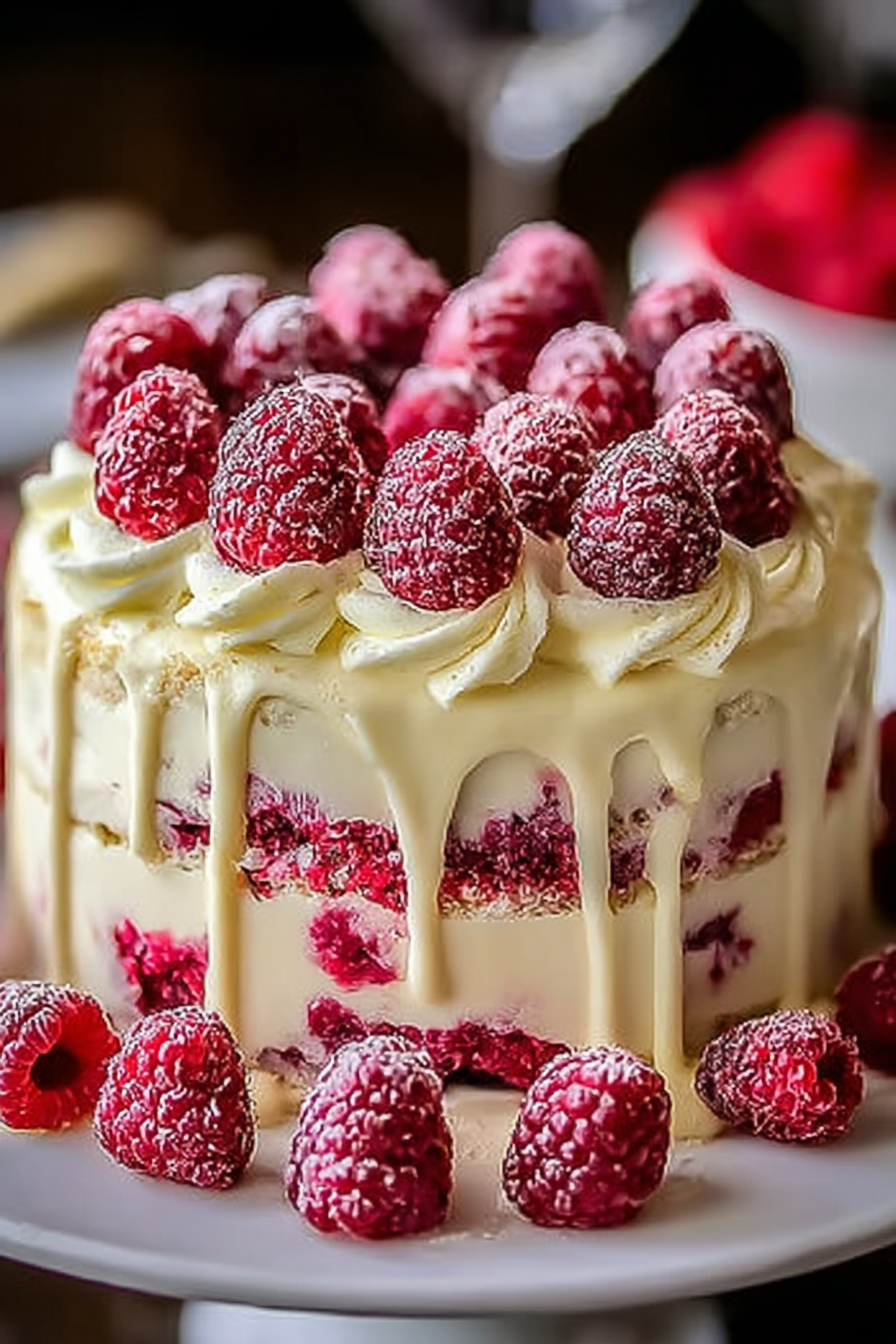
Have you ever tasted a dessert so exquisite it sends shivers of pure joy down your spine? Prepare yourself, because the White Chocolate Raspberry Dream Cake: A Heavenly Dessert is about to redefine your understanding of delicious. Imagine sinking your teeth into layers of melt-in-your-mouth white chocolate, tart raspberries bursting with flavor, and a cake so light it practically floats.
This cake isn’t just a recipe; it’s a portal to a sweeter reality, a testament to the power of baking to conjure pure bliss. It’s the dessert I made for my best friend’s wedding, a moment forever etched in my memory alongside the breathtaking taste.
This White Chocolate Raspberry Dream Cake boasts several delightful features.
Its preparation is surprisingly straightforward, even for novice bakers.
The flavor combination is a masterpiece of contrasting sweet and tart notes, creating a symphony on the tongue.
Visually stunning, its layers of white chocolate and vibrant raspberries create a feast for the eyes, before even a single bite.
Its versatility shines through: serve it at a birthday party, a romantic dinner, or simply indulge in a slice on a Tuesday night.
Ingredients for White Chocolate Raspberry Dream Cake: A Heavenly Dessert
Here’s what you’ll need to make this delicious dish:
The full ingredients list, including measurements, is provided in the recipe card directly below.
How to Make White Chocolate Raspberry Dream Cake: A Heavenly Dessert
Follow these simple steps to prepare this delicious dish:
Step 1: Preparing the Cake Batter
Preheat your oven to 350°F (175°C). Grease and flour two 9-inch round cake pans. In a large bowl, cream together the butter and sugar until light and fluffy. Beat in the eggs one at a time, then stir in the vanilla. In a separate bowl, whisk together the flour and baking powder. Gradually add the dry ingredients to the wet ingredients, alternating with the milk, beginning and ending with the dry ingredients. Mix until just combined.
Step 2: Baking the Cake Layers
Divide the batter evenly between the prepared cake pans. Bake for 25-30 minutes, or until a wooden skewer inserted into the center comes out clean. Let the cakes cool in the pans for 10 minutes before inverting them onto a wire rack to cool completely.
Step 3: Making the Raspberry Filling
While the cakes are cooling, gently mash about 1 cup of raspberries. If you are using frozen raspberries ensure they are fully thawed and any excess liquid has been drained.
Step 4: Preparing the White Chocolate Frosting
Melt the white chocolate in a double boiler or microwave, stirring frequently to prevent burning. In a small saucepan, whisk together the agar-agar powder with a little cold water to form a slurry. Slowly bring the remaining water to a simmer, whisk in the agar-agar slurry, and cook until clear and thickened, about a minute. Remove from heat. Gradually whisk in the powdered sugar and a splash of milk until smooth. Let cool slightly before gently folding in the melted white chocolate.
Step 5: Assembling the Cake
Once the cakes and frosting have cooled, level the tops of the cakes with a serrated knife if necessary. Place one cake layer on a serving plate. Spread half of the raspberry filling evenly over the cake layer. Top with the second cake layer and frost the entire cake with the white chocolate frosting.
Step 6: Garnishing and Serving
Garnish with fresh raspberries and a dusting of powdered sugar. Refrigerate for at least 30 minutes before serving to allow the flavors to meld. Serve chilled, and prepare for pure bliss. Enjoy every delicious bite of your White Chocolate Raspberry Dream Cake: A Heavenly Dessert!
Perfecting the Cooking Process
Prepare the raspberry filling first, allowing it to chill completely. Then, make the white chocolate mousse, ensuring it’s properly whipped. Finally, assemble the cake layers, chill, and frost. This ensures a smooth, delicious result.
Add Your Touch
Swap raspberries for blueberries or strawberries. Consider adding a hint of Alcohol-free vanilla extract to the mousse or a touch of lemon zest to the cake layers. A sprinkle of chopped pistachios adds a delightful crunch.
Storing & Reheating
Store leftover cake tightly covered in the refrigerator for up to three days. Reheat individual slices gently in the microwave for a few seconds, or let it sit at room temperature for a while to soften.
Prepare the raspberry filling ahead of time, allowing ample chilling. This way the whole process is faster and tastier.
Use high-quality white chocolate for the richest flavor and texture; don’t substitute!
Avoid over-whipping the mousse. A slightly under-whipped mousse is smoother and more decadent.
My sister’s birthday was the first time I baked this White Chocolate Raspberry Dream Cake. Her reaction? Pure bliss, a reaction I have always treasured.
White Chocolate Raspberry Dream Cake
: A Heavenly Dessert
This White Chocolate Raspberry Dream Cake isn’t just a recipe; it’s a journey. A journey into a world of creamy white chocolate, tart raspberries, and pure, unadulterated deliciousness. It’s the kind of cake that makes you close your eyes, sigh contentedly, and think, “Life is good.” And if life isn’t good right now, well, this cake will certainly make it better.
The Raspberry Rhapsody
: Crafting the Perfect Filling
First, let’s tackle the star of the show – the raspberry filling. We’re not messing around with store-bought stuff here. This is homemade, from-scratch goodness, and the difference is night and day. Imagine fresh, plump raspberries, bursting with juicy sweetness. That’s what we’re aiming for.
You’ll need about a pound of fresh raspberries, a touch of lemon juice (to enhance their natural tartness), and a little bit of sugar (to balance the tartness and bring out the raspberry’s full potential). Combine these in a saucepan and gently simmer them until they soften and release their luscious juices. The mixture will thicken naturally as it cooks. Now, here’s where it gets interesting. We’re going to use a plant-based gelling agent to give the filling some structure – agar-agar is a fantastic choice. Follow the package instructions for how much to add, and it will transform your cooked raspberries into a glorious, jiggly, perfectly set filling. Let it cool completely; this is key to preventing the filling from melting into the cake.
Whipping Up a White Chocolate Wonderland
: The Mousse Magic
Next up: the white chocolate mousse. Oh my goodness, the white chocolate mousse. This isn’t your average mousse; this is a cloud of creamy, dreamy perfection. We’re talking about high-quality white chocolate here, folks – the kind that melts in your mouth like a little piece of heaven.
Chop it finely, and melt it gently (a double boiler is ideal) with a touch of cream. Let it cool slightly, then whip it up with some coconut cream until it reaches airy, light peaks. This is where patience is key. Over-whipping will lead to a grainy texture; under-whipping will leave you with a mousse that’s too runny. The key is to get that perfect balance – light and airy, but still holding its shape.
Building the Cake
: Layers of Delight
Now comes the fun part – the assembly. We’ll be using a classic three-layer cake for this recipe. The first layer is the base, a simple and delicious vanilla sponge cake. You can easily make one from scratch, or use store-bought sponge layers if you’re short on time (no judgment!).
Once you have your layers, it’s time to build your masterpiece. Spread a generous layer of the chilled raspberry filling onto the bottom layer of cake. Top it with another layer of sponge cake, and then spread the light-as-air white chocolate mousse evenly over the second layer. Finally, place the third layer of cake on top, gently pressing down to secure everything.
Frosting and Finishing Touches
: The Grand Finale
We’re almost there. Now, it’s time for the frosting. A simple vanilla buttercream will work beautifully. You could even make a white chocolate buttercream by incorporating some melted white chocolate into your buttercream recipe. Get creative! Once frosted, chill the cake for at least an hour to allow the flavors to meld and the frosting to set. And then… the moment of truth. Slice, serve, and watch as your guests’ eyes widen with delight. This isn’t just a cake; it’s an experience.
White Chocolate Raspberry Dream Cake
: A Sweet Success Story
This White Chocolate Raspberry Dream Cake is more than just a recipe; it’s a testament to the power of homemade goodness. Each bite is a burst of flavor, a perfect balance of sweet and tart, creamy and refreshing. It’s the kind of dessert that brings joy, memories, and a whole lot of happy sighs around the table. So, gather your ingredients, roll up your sleeves, and prepare to create something truly magical. You won’t regret it.
Conclusion for White Chocolate Raspberry Dream Cake: A Heavenly Dessert
This White Chocolate Raspberry Dream Cake is a delightful journey for your taste buds, a symphony of white chocolate and tart raspberries. Its surprisingly simple recipe belies its elegant result. The recipe allows for easy substitutions, ensuring that even those with dietary restrictions or preferences can enjoy this creation. Remember to give yourself enough time, as making this culinary masterpiece is a rewarding process. The final product? Pure, unadulterated deliciousness that will leave you dreaming of more. So gather your ingredients and get baking!
Print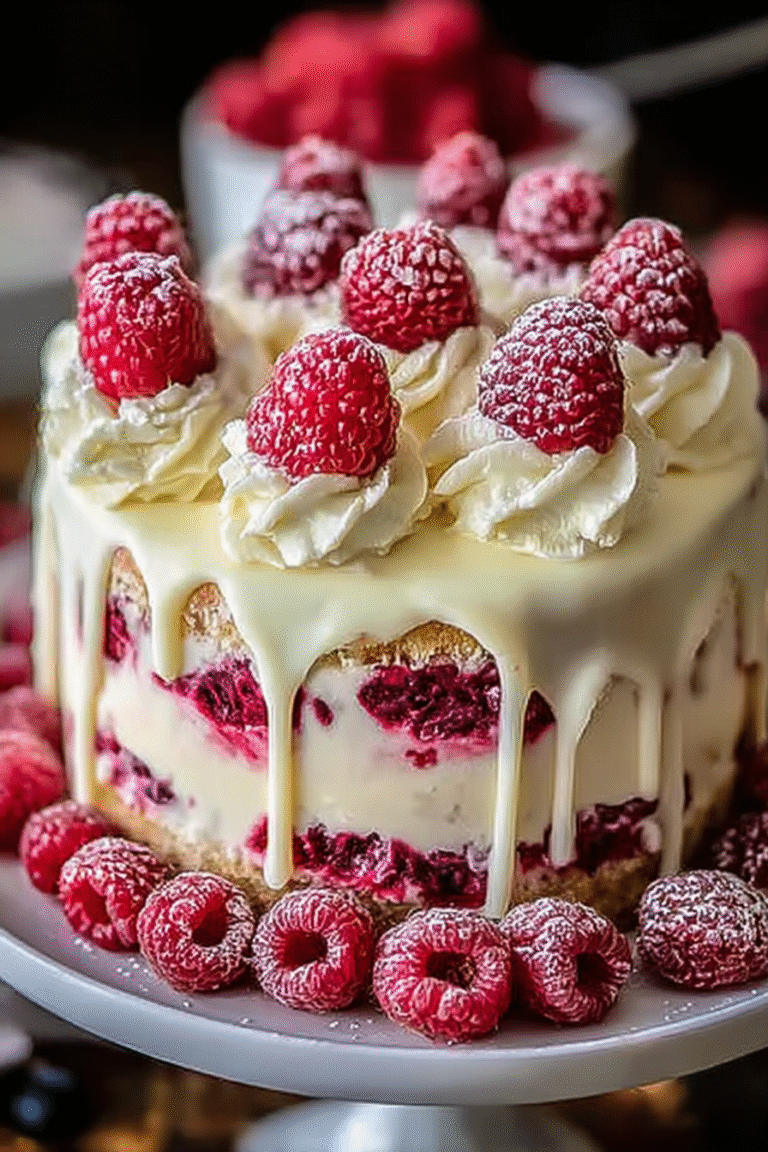
White Chocolate Raspberry Dream Cake: A Heavenly Dessert
Delicious white chocolate raspberry dream cake: a heavenly dessert recipe with detailed instructions and nutritional information.
- Total Time: 35 minutes
- Yield: 4 servings 1x
Ingredients
- 2 cups all-purpose flour
- 2 cups granulated sugar
- 1 tsp baking powder
- 1/2 tsp baking soda
- 1/4 tsp salt
- 1 cup (2 sticks) unsalted butter, softened
- 4 large eggs
- 1 cup buttermilk
- 1 tsp vanilla extract
- 12 oz white chocolate, chopped
- 1 cup fresh raspberries
Instructions
- Step 1: Preheat oven to 350°F (175°C). Grease and flour two 9-inch round cake pans. In a medium bowl, whisk together flour, sugar, baking powder, baking soda, and salt.
- Step 2: In a large bowl, cream together the softened butter and sugar until light and fluffy. Beat in eggs one at a time, then stir in the vanilla extract.
- Step 3: In a small bowl, gently whisk together the buttermilk and melted white chocolate. Gradually add the dry ingredients to the wet ingredients, alternating with the buttermilk mixture, beginning and ending with the dry ingredients. Mix until just combined. Fold in half of the raspberries.
- Step 4: Divide the batter evenly between the prepared cake pans. Bake for 30-35 minutes, or until a wooden skewer inserted into the center comes out clean.
- Step 5: Let the cakes cool in the pans for 10 minutes before inverting them onto a wire rack to cool completely. Once cool, frost with your favorite white chocolate buttercream frosting and garnish with the remaining raspberries.
Notes
- Store leftover cake in an airtight container at room temperature for up to 3 days, or in the refrigerator for up to a week.
- For a warm, gooey center, gently reheat individual slices in the microwave for 15-20 seconds.
- Serve this dreamy cake with a scoop of vanilla bean ice cream or a dollop of whipped cream for an extra decadent treat.
- To prevent the raspberries from sinking to the bottom, gently toss them in a tablespoon of flour before folding them into the batter.
- Prep Time: 15 minutes
- Cook Time: 20 minutes
- Method: Stovetop
- Cuisine: American
FAQs
Can I make this White Chocolate Raspberry Dream Cake ahead of time?
Absolutely! This White Chocolate Raspberry Dream Cake is even better the next day. Make it a day or two in advance and store it in the refrigerator. The flavors will meld beautifully, and the cake will be wonderfully moist. Just remember to let it sit at room temperature for about 30 minutes before serving to allow the flavors to fully express themselves. Trust me, the anticipation is almost as delicious as the cake itself!
What can I substitute for the agar-agar?
While agar-agar gives this White Chocolate Raspberry Dream Cake its lovely, delicate texture, you can experiment with other plant-based gelling agents. Pectin is a good option, but you may need to adjust the amount based on the type you use and follow the package instructions carefully. Carrageenan is another possibility, but it can sometimes result in a slightly different texture. Always conduct a small test batch if you’re substituting ingredients, especially when dealing with gelling agents.
Is this White Chocolate Raspberry Dream Cake suitable for freezing?
Yes, you can freeze this heavenly dessert! Wrap the whole cake tightly in plastic wrap and then foil, ensuring no air gets in. Freeze for up to two months. Thaw it in the refrigerator overnight and let it sit at room temperature for a couple of hours before serving. This White Chocolate Raspberry Dream Cake’s texture might be slightly different after freezing, but it will still taste amazing.
How can I make my White Chocolate Raspberry Dream Cake even more impressive?
For a truly show-stopping White Chocolate Raspberry Dream Cake, consider adding a fresh raspberry coulis to the top before serving. A simple coulis is easy to make: just blend fresh raspberries with a touch of lemon juice and sugar. You could also decorate the cake with white chocolate shavings or fresh raspberries for extra visual appeal. This will create a truly memorable dessert that is guaranteed to impress everyone.


Leave a Comment